I think it came out pretty well, but by the time I had made the second one I was just over it. It came out pretty well too, but I still have to put the fabric edging at the top. By the time I finally got the book, I was just over it all totally, but I did look through it, decided that it didn't tell me any more than the online resources had. You can basically learn this technique and not even need the book.
After that, I just got in the mood to work on crocheting granny squares. I did some images searches in Google and saw some really pretty scarves, so I decided to make one. I made the first one and really liked it, then I decided to make another one for my mother-in-law for Christmas.
The lighter colored one is the first one I made and the second one in the dark lavender is the one I made for my mother-in-law. Granny squares are really fun to crochet and you don't need that many for a scarf .. about 12. I crocheted a single crochet around the outside edge of the scarf all the way around and added some fringe.
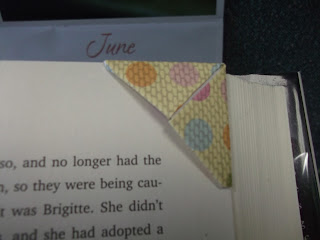
I was on Pinterest earlier this week and I saw a really cute idea for bookmarks. I love origami and I found this great tutorial for making them. When you get to the blog page, just scroll down a little bit and you will find the tutorial for the origami bookmarks. They are so easy to make and lots of fun with different colored papers. I first tried it with some origami papers and then realized that the paper is not strong enough to stay on the corner of your book page. So, I found some scrapbook papers that I had at home and they are the exact size (3 inch square), so I made several with them and they came out great! I love these! They stay on the corner of your page and you can keep them on there until you finish reading and then move them to mark your new page. One thing I did a little differently from the tutorial was fold in the back flap also, so that when you turn your page, the bookmark will not be in the way of your reading. Here are a few that I made:
To give you a little more detail, here are some photos to show you how I folded the back flap in so that it doesn't show on the back when you are reading the next page:
After you follow the instructions in the tutorial (the link I mentioned above), your bookmark will look like this:
To fold the back flap in, I turn the bookmark over and fold the flap toward the back to crease it,
Then I turn it back over, and fold the flap inside the bookmark, like this:
When you finish, the bookmark will look like this:
Then you can put it on your page,
and leave it there while you read, and move it to mark your place when you stop reading.
I love these little bookmarks. They are fun to make and really cute out of the scrapbook papers. I hope these photos make sense. If not, let me know and I will try to take some pictures of the whole process.


No comments:
Post a Comment